
HyperDisk is a Mac app for cleaning your hard drive. With HyperDisk you’ll be able to inspect and analyze the contents of your disk, and to confidently delete space-wasting files from your Mac.
HyperDisk suits two different types of users: those who want to do disk cleanup on their own, and those who prefer to let the app handle it for them. In this User Guide you’ll learn how to most effectively use HyperDisk to maintain a clean Mac.
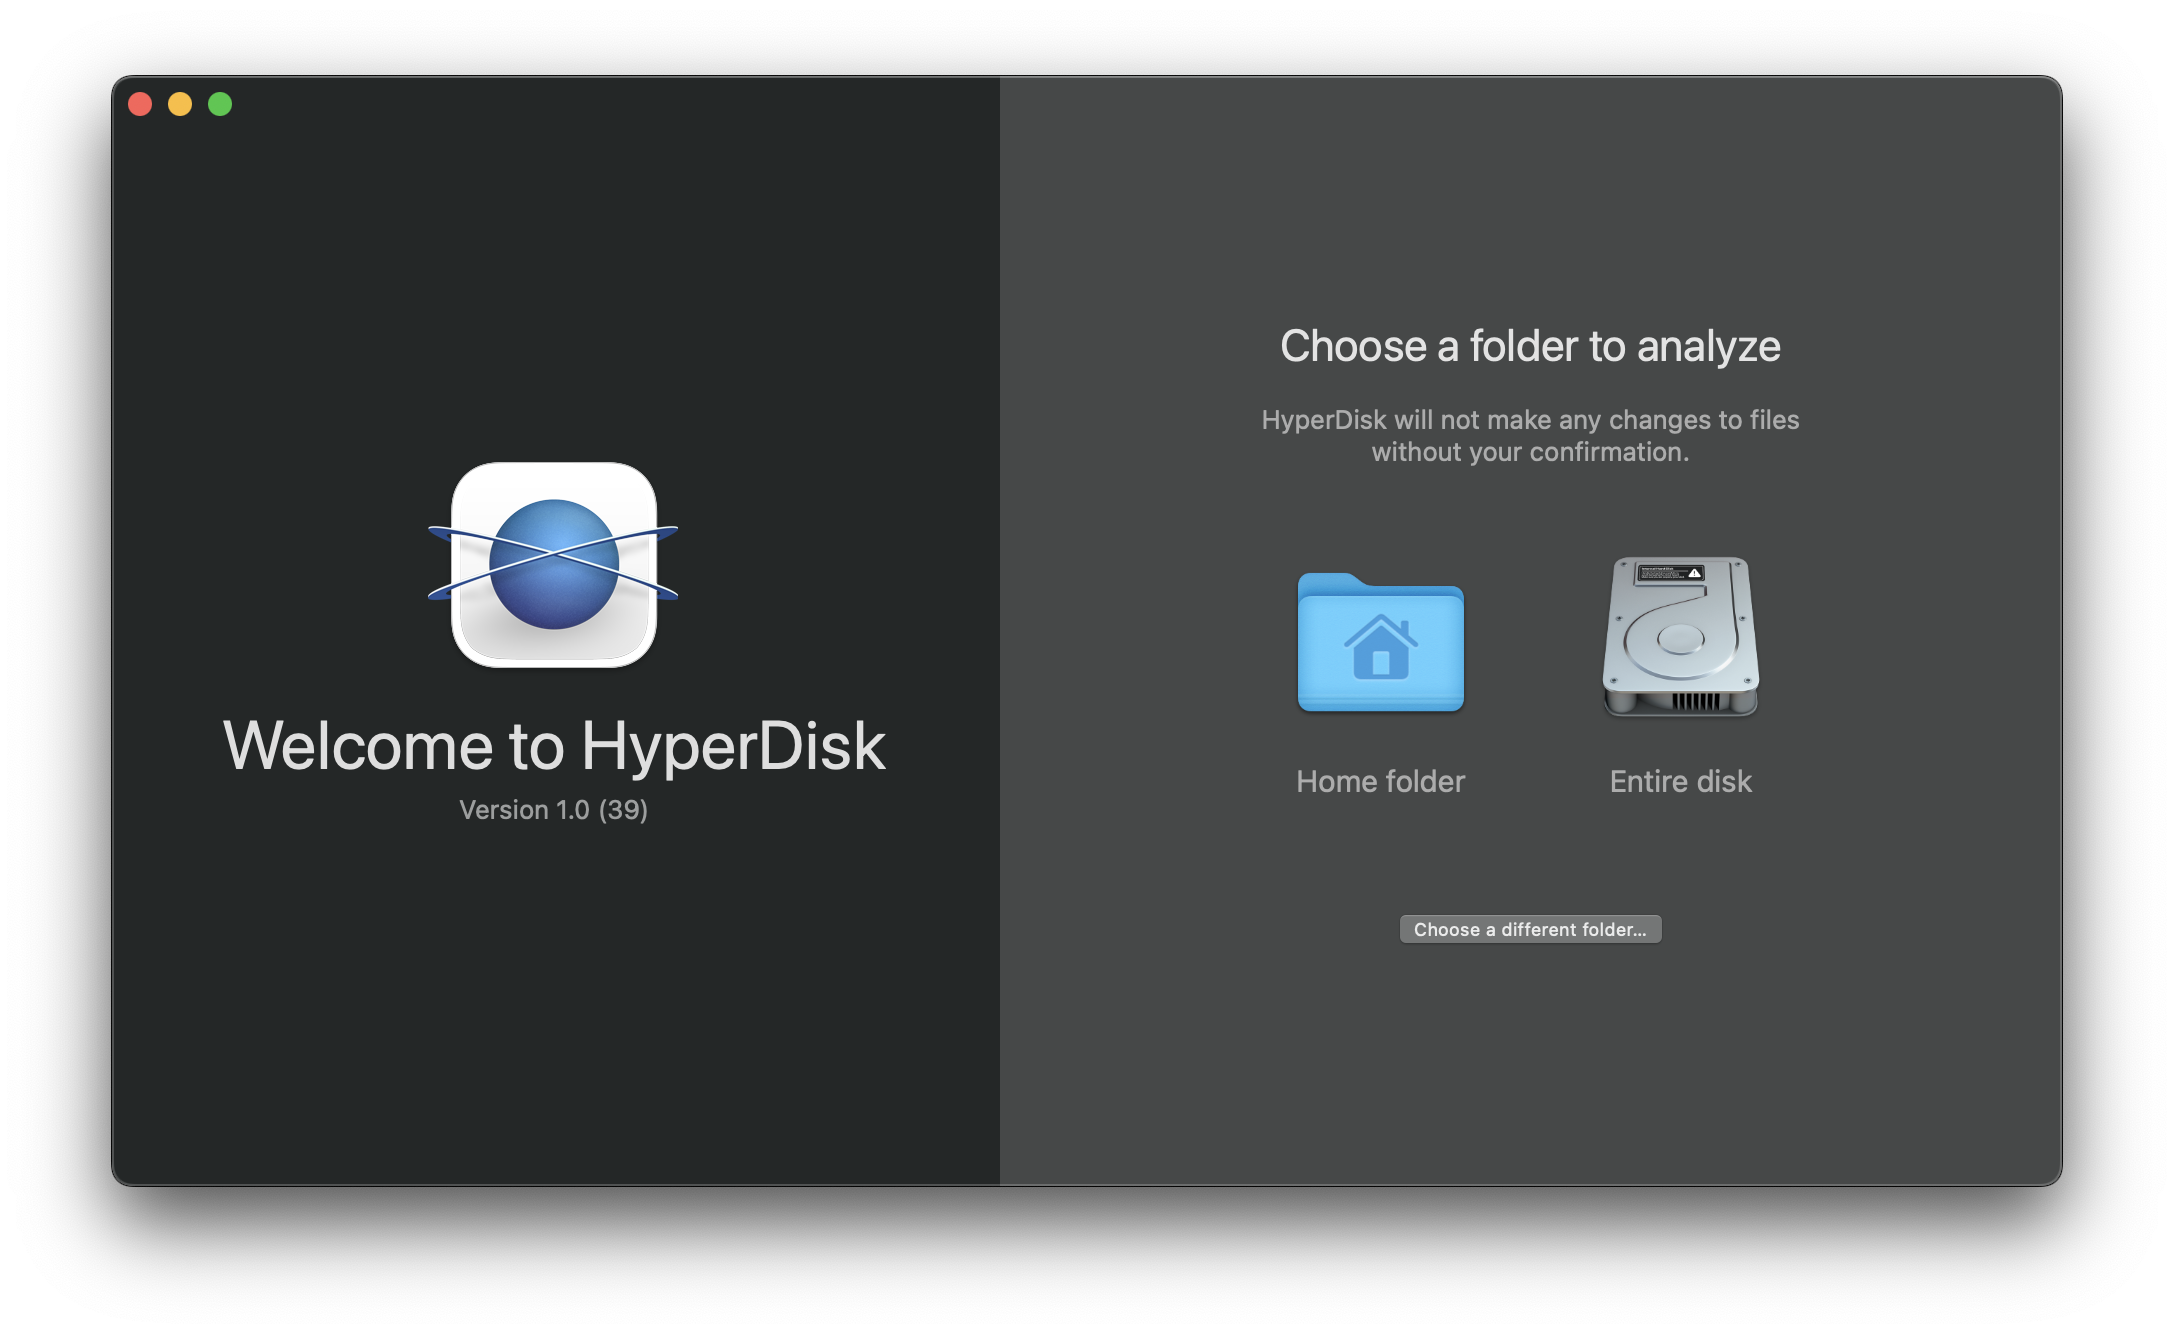
After downloading HyperDisk from the Mac App Store, launch it from your Applications folder (or, if you like, drag it onto your dock.) It’ll present you with its main window. If you haven’t launched HyperDisk before, you’ll see a window as shown in Fig. 1. If you’ve run HyperDisk before, you’ll see something like Fig. 2.
Select a folder to scan. We recommend starting with your home folder, as this is where most of the user-generated files will be on a Mac.
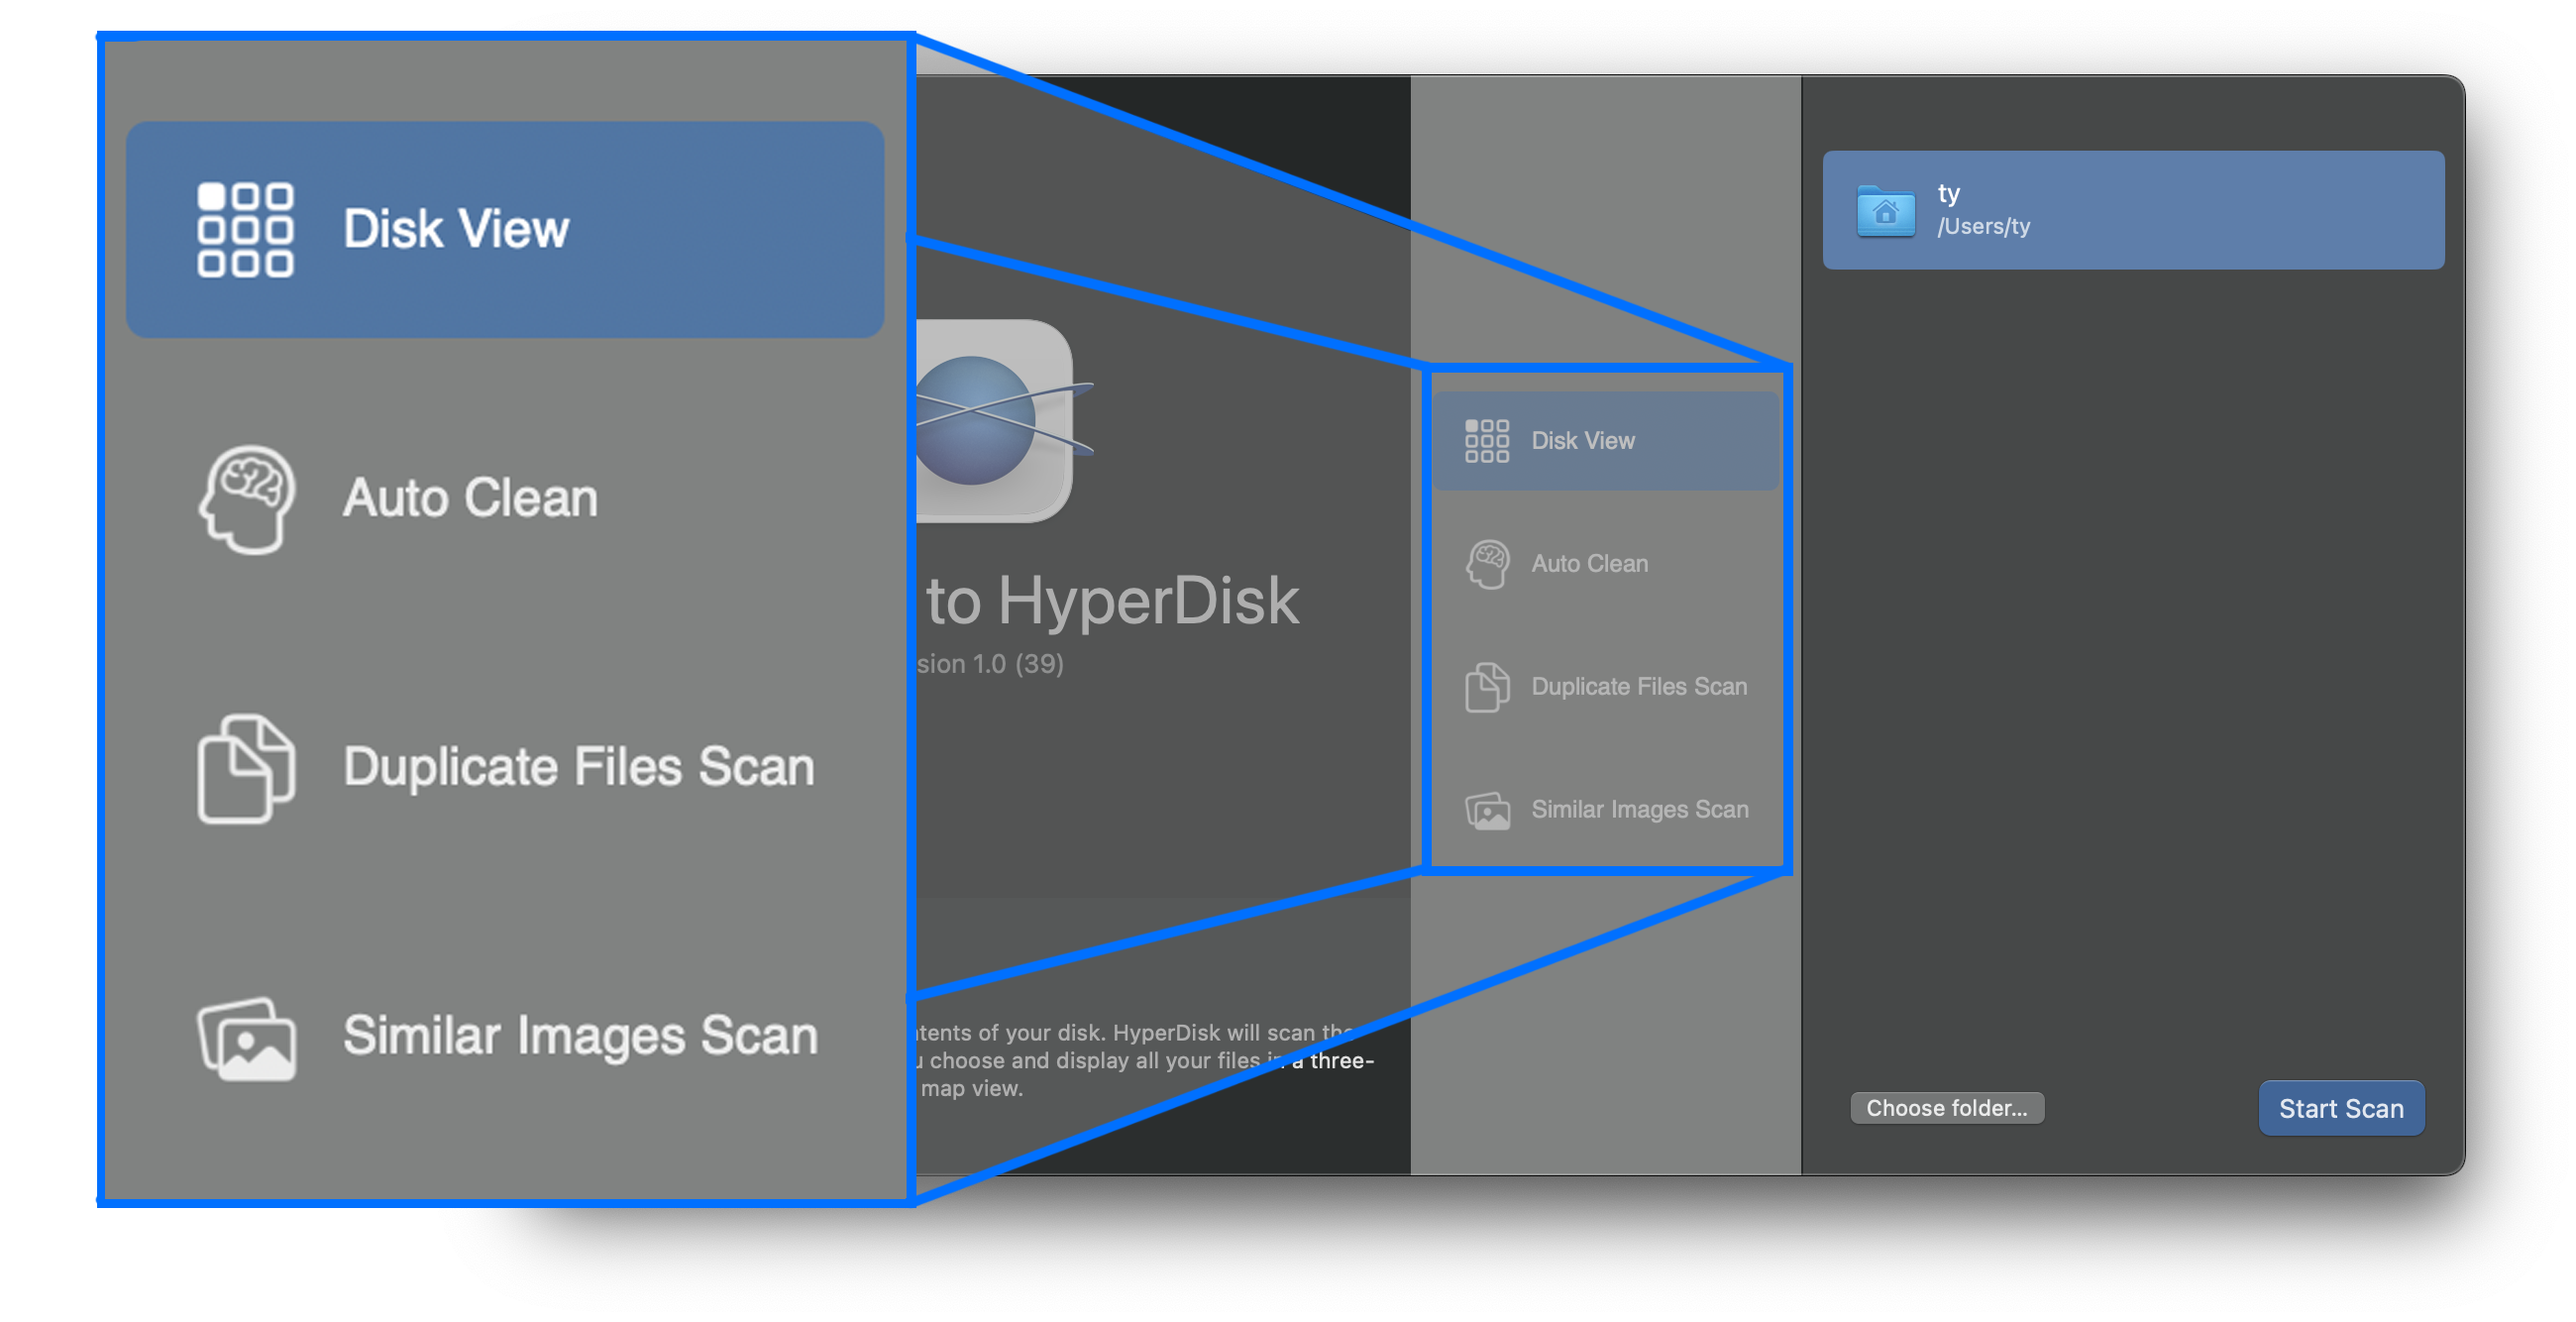
When in the main window, you’ll see four options (Fig. 2). They are:
Let’s start with Disk View. Select Disk View, and click the Start Scan button at the bottom-right of the window (or hit Return).
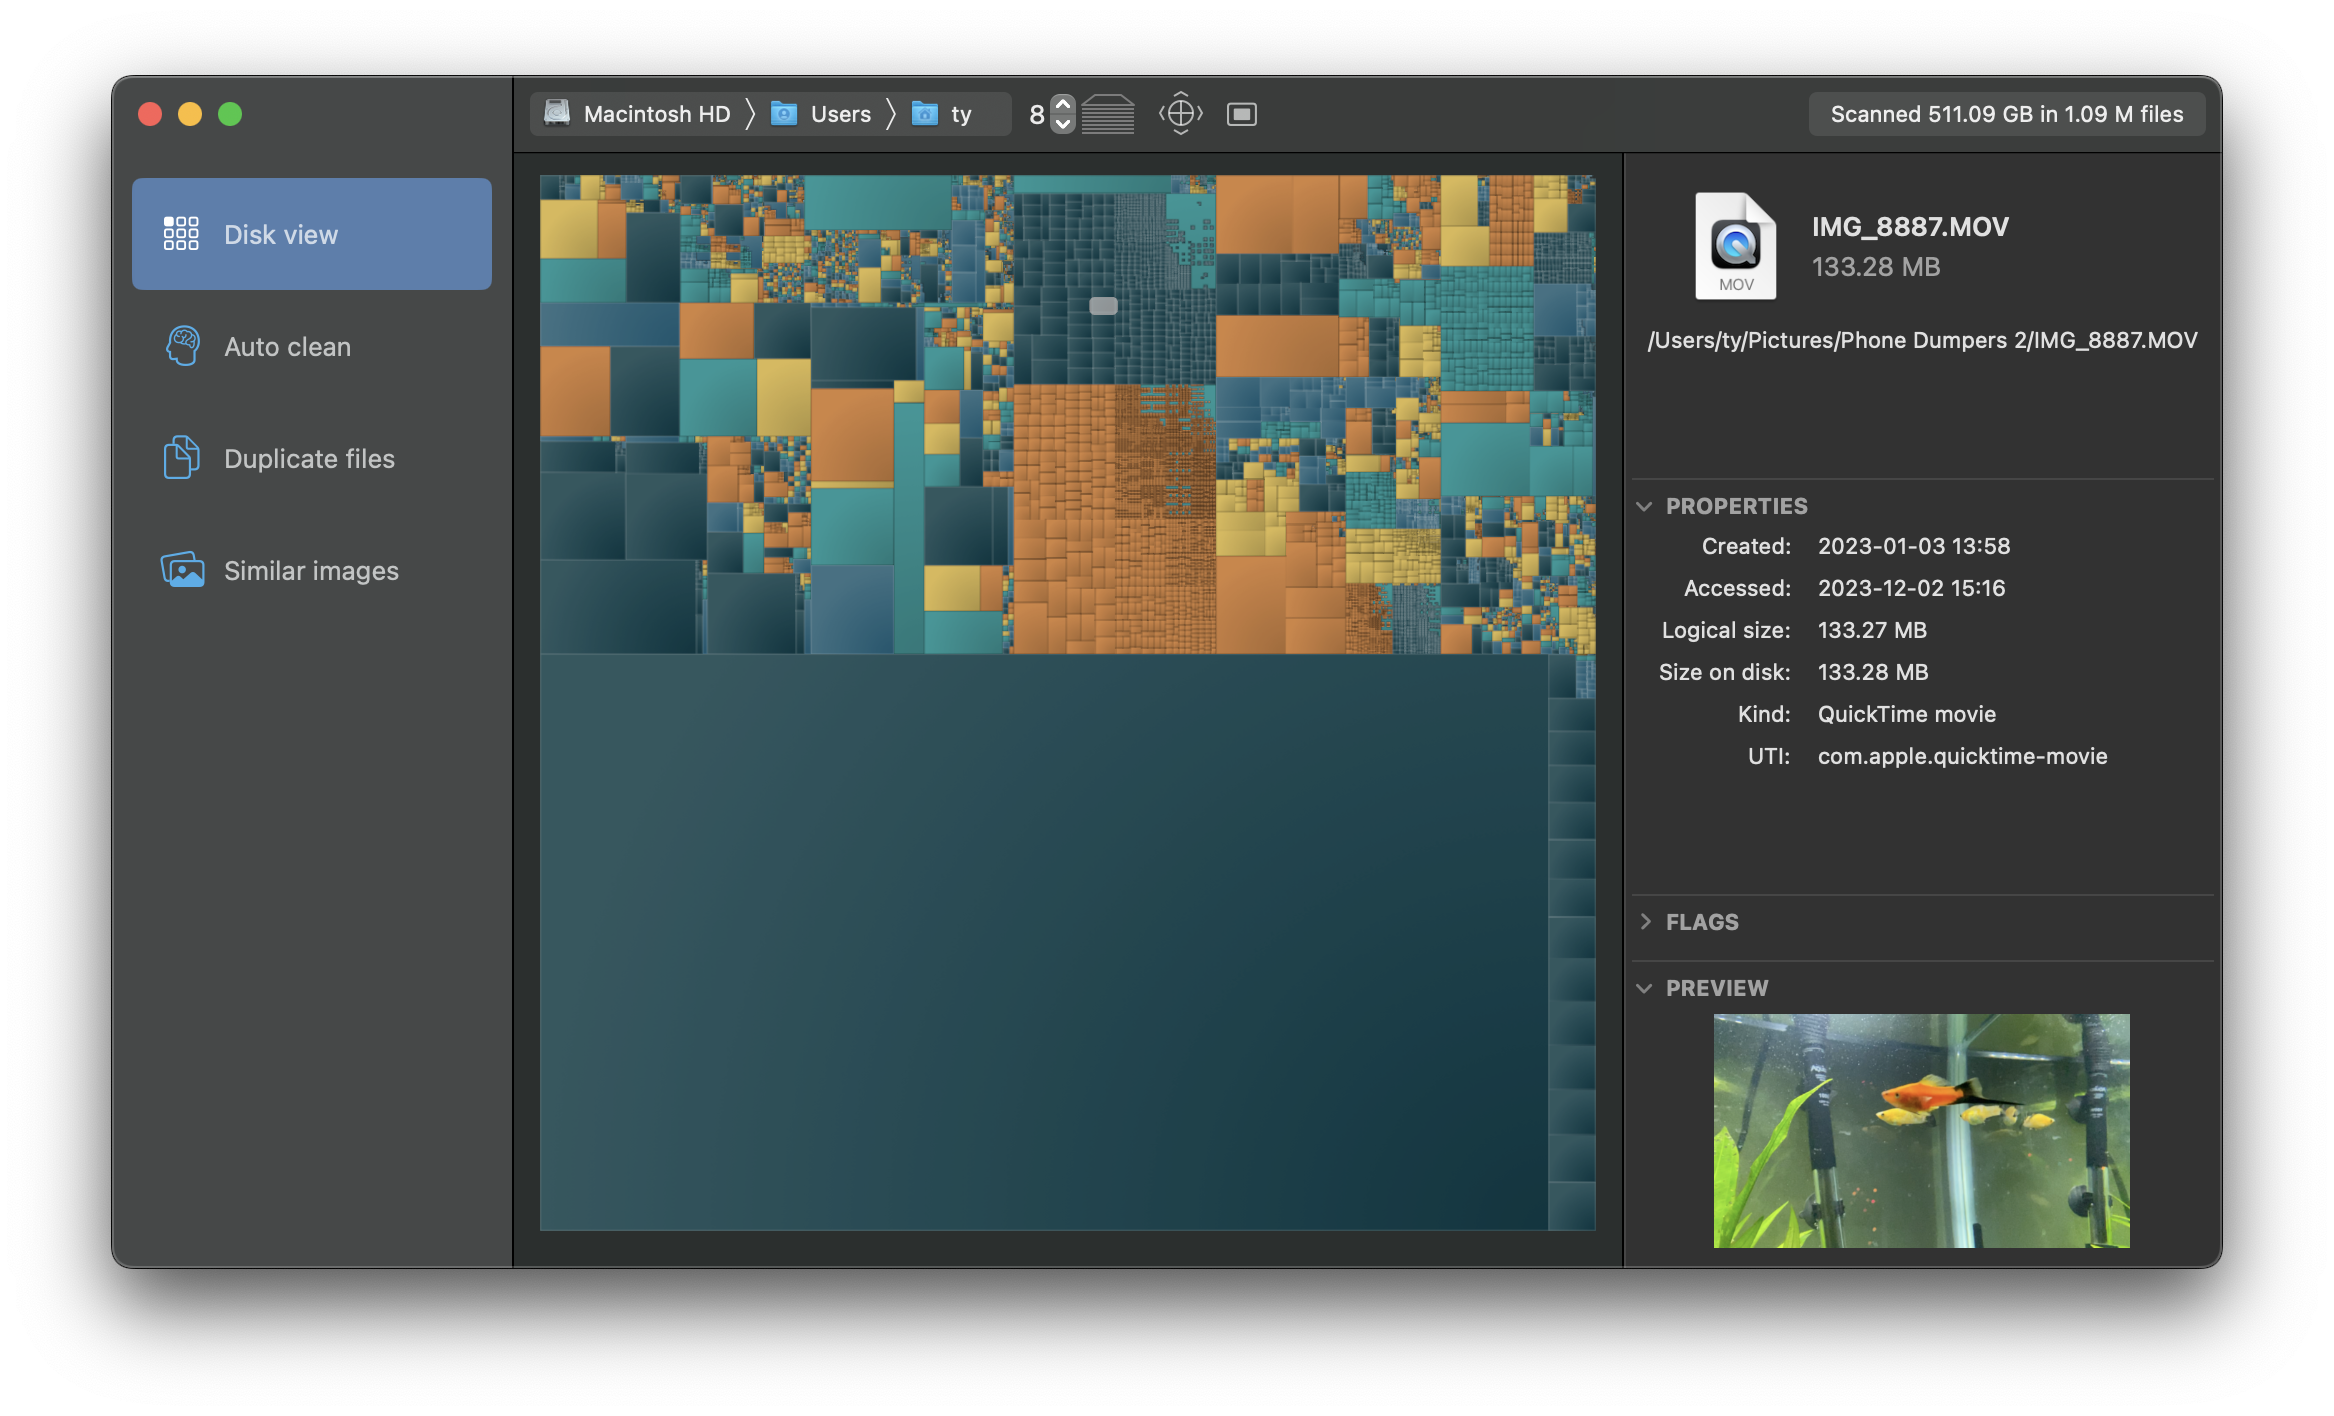
HyperDisk will begin scanning all your files. When finished, you’ll be presented with HyperDisk’s 3D disk view. In this view, everything on your disk is represented as a rectangle. The sizes of these rectangles correspond to the amount of space they’re taking up on your drive. You can right-click on them for more information, or click and drag the background to tilt the view into 3D mode.
To explore HyperDisk’s other features, such as duplicate scan or auto cleaning, click on one of the options to the left of the window.
Closing HyperDisk’s window takes you back to the main window. Closing the main window quits the application.
HyperDisk requires a Mac with Apple Silicon or an Intel CPU, running macOS 12.4 or higher. 8GB RAM is required, 16GB or higher is preferred. HyperDisk scans much faster on SSD drives than traditional spinning HDD drives.
HyperDisk is available exclusively from the Mac App Store. For security reasons, it’s preferable to get your apps from the App Store when possible. App Store apps carry with them a greater assurance of safety, for two main reasons: 1) They have been reviewed by Apple for quality and safety, and 2) They are forced to run within a restrictive “sandbox” environment, making it difficult for them to damage your Mac.
After purchasing HyperDisk, download it from the App Store by clicking “Install”. As an App Store app, HyperDisk will auto-update when newer versions become available.
Launch HyperDisk.app from the Applications folder by double-clicking it. If you’d like to put it on your dock, drag its icon onto your dock where you’ll be able to launch it with a single click.
HyperDisk does not install extra files and helpers on your Mac. To uninstall HyperDisk, all you have to do is drag the application to the trash and empty it.
You’ll run HyperDisk by launching the application, choosing a folder or disk to scan, selecting a mode to use, and pressing Start.
HyperDisk operates on the contents of a specific folder you choose. Previously-scanned folders will show up in HyperDisk’s list the next time you run the app. You’ll probably want to scan your entire disk, or your home folder. Once you select the folder to scan you’ll be asked for permission. This is part of macOS’ security system, designed to prevent apps from operating in unauthorized parts of your disk.
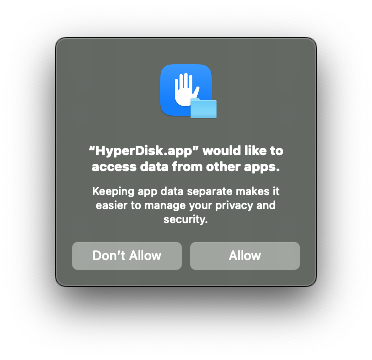
At times, you’ll be prompted with a series of authorization requests. You’ll be asked to allow access to things like your Photo Library and your Desktop folder. Please allow all these requests, as HyperDisk is not able to scan and analyze folders to which it’s not authorized.
These security measures are built into macOS, and they help to keep your computer safe.
No matter which mode you choose (Disk View, Auto Clean, etc.,) HyperDisk will start by scanning your file tree. Since HyperDisk delves into all the folders and subfolders, this can be a time consuming process. A status window will appear if the scan is taking more than a few seconds. You’ll see a meter showing the rate at which HyperDisk is scanning your files. The meter is coded with HDD (Hard Disk Drive,) SSD (Solid State Drive,) and NVMe (Non-Volatile Memory express,) corresponding roughly with the speeds you can expect from each class of storage device.
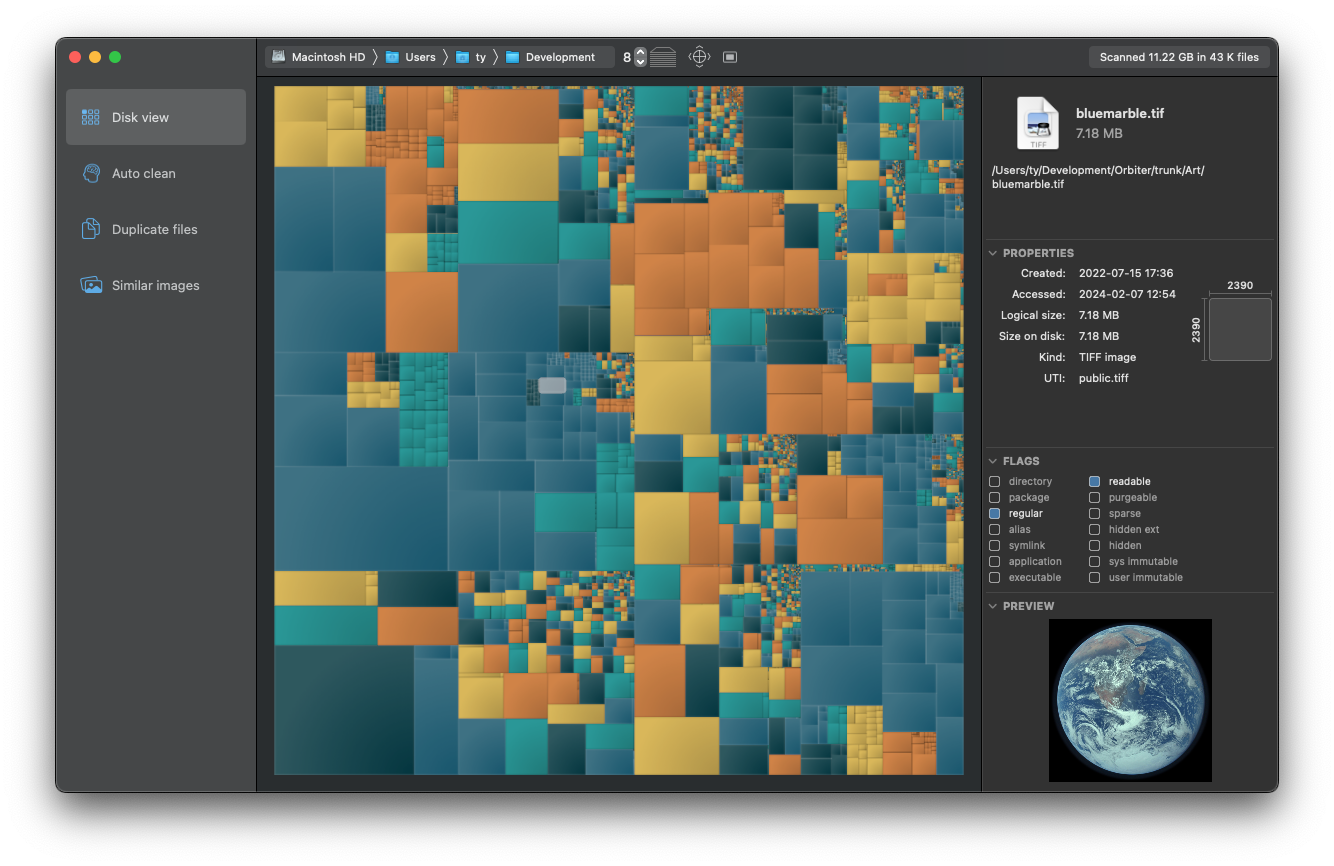
When the scan completes, you’ll see a big rectangle comprised of smaller rectangles. These represent folders and files on your Mac. Files within the same folder are next to each other, and colored with the same hue.
You can hover your mouse over this view to see some information and a preview (if available) of the files. Clicking on a rectangle will bring up a menu with some options specific to the file.
The 2D disk view is in effect just a straight top-down view onto the 3D disk view. Hovering your mouse over a rectangle shows some information about it in the panel to the right.
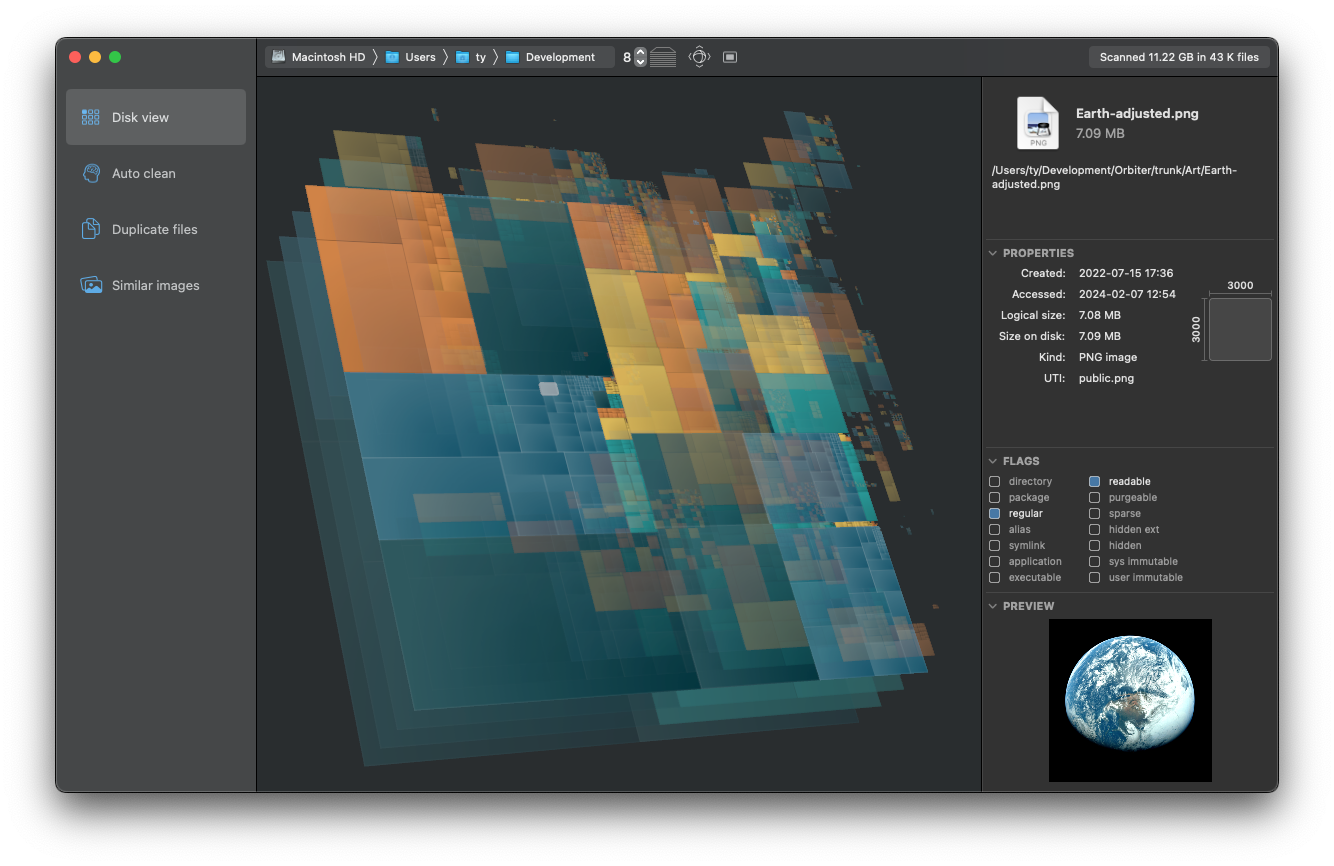
You can tilt and rotate the 2D disk view into 3D mode either by clicking and dragging on the view background, or by using the arrow keys.
In 3D mode, the top-level folders of the scan are shown as larger rectangles at the bottom. These folders’ contents are then drawn as smaller rectangles above, and so on. A finite number of levels will be drawn, and this number can be changed via the stepper control at the top, or with ⌘- and ⌘=.
Hovering your mouse over a rectangle shows some information about it in the panel to the right.
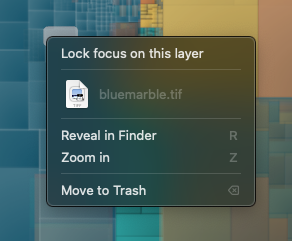
Clicking on a rectangle in the disk view will bring up a menu of actions.
To quickly find out what’s taking up large amounts of space on your disk, try finding big rectangles or big clumps of rectangles and moving your mouse over them. As you do this, look at the file’s path in the top-right of the window. This will give you an idea of where the file comes from, and what it’s doing.
Be careful with what you delete. When in doubt, hang on to the file. The safest thing to do is to back up any files you’re uncertain about before you delete them.
See Disk View
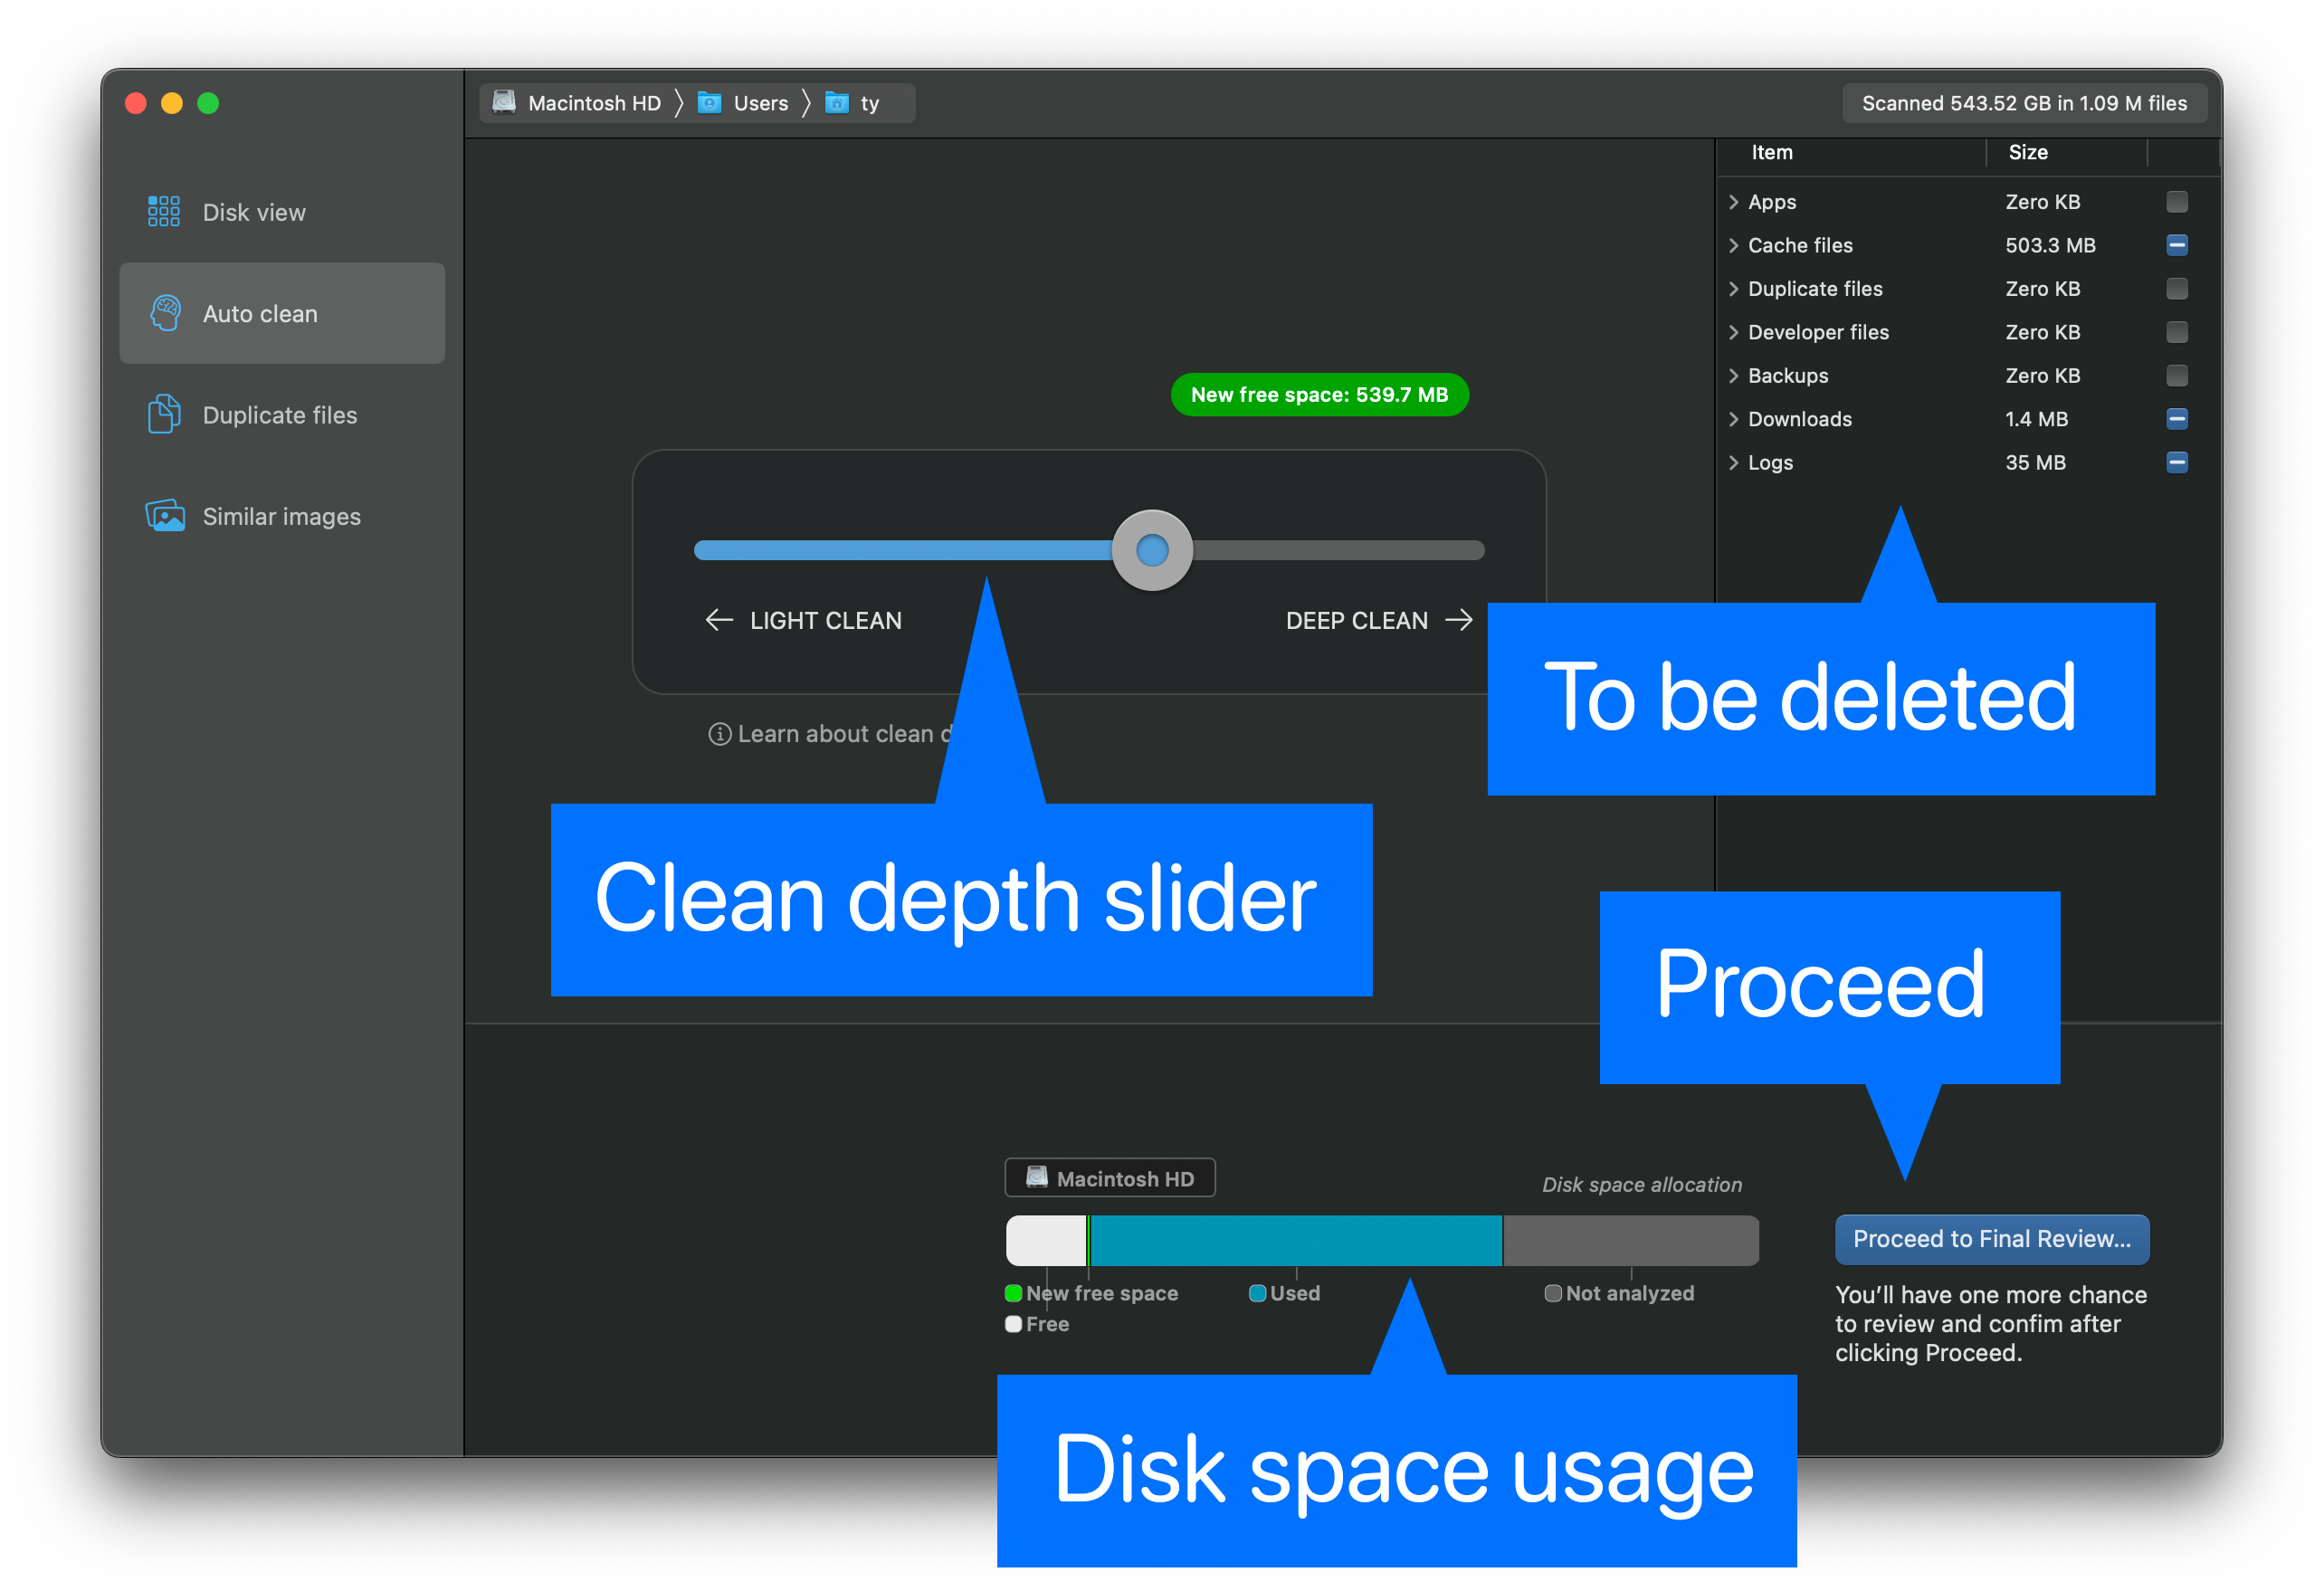
You can control how aggressively HyperDisk cleans your drive by moving the large slider between light clean and deep clean. As you do this, the amount of space to be freed up will update inside the green capsule above the slider. A specific list of files to be deleted or linked together is shown at the right.
It is recommended to start with a fairly light clean, as long as a significant amount of space is freed up by such. Light clean will only delete files which are almost certainly unnecessary, such as old cache files. As you increase the depth of the clean HyperDisk deletes more aggressively, removing things like certain duplicate files and applications which haven't been used in a long time.
HyperDisk may show some alerts in Auto-Clean.
Hard links are effectively multiple files which all reference the same underlying content. You can have a number of hard links of a particular file, and they will occupy only the space of a single copy of that file on your disk. HyperDisk has the ability to find large identical files, and hard link them together to free up space.
In depth:
To really understand how hard links work, some background
on filesystems is helpful. On modern computers, files are stored on the disk
as something called an inode, as in “index node.” These are the raw on-disk
files, containing the real data that the file holds. The files that show up
on your computer as documents, images, videos etc, are all references to a
particular inode.
By creating two or more files which both refer to the same inode, we have created what’s known as a hard link. HyperDisk can identify duplicate files, and if they’re all referring to different inodes, it can delete all but one of those inodes and make hard linked files that all point to the same inode. For example, four identical 1GB files could be merged so that they appear the same, but take only 1GB of total space.
Auto Clean is a feature to be used with caution. Unless you’re doing a very light clean (10% or less on the slider,) it’s very important to review the files that will be deleted. You can click “Proceed to Final Review…” without committing to anything. The following confirmation screen is the one where you look through the proposed deletions, and approve or deny them.
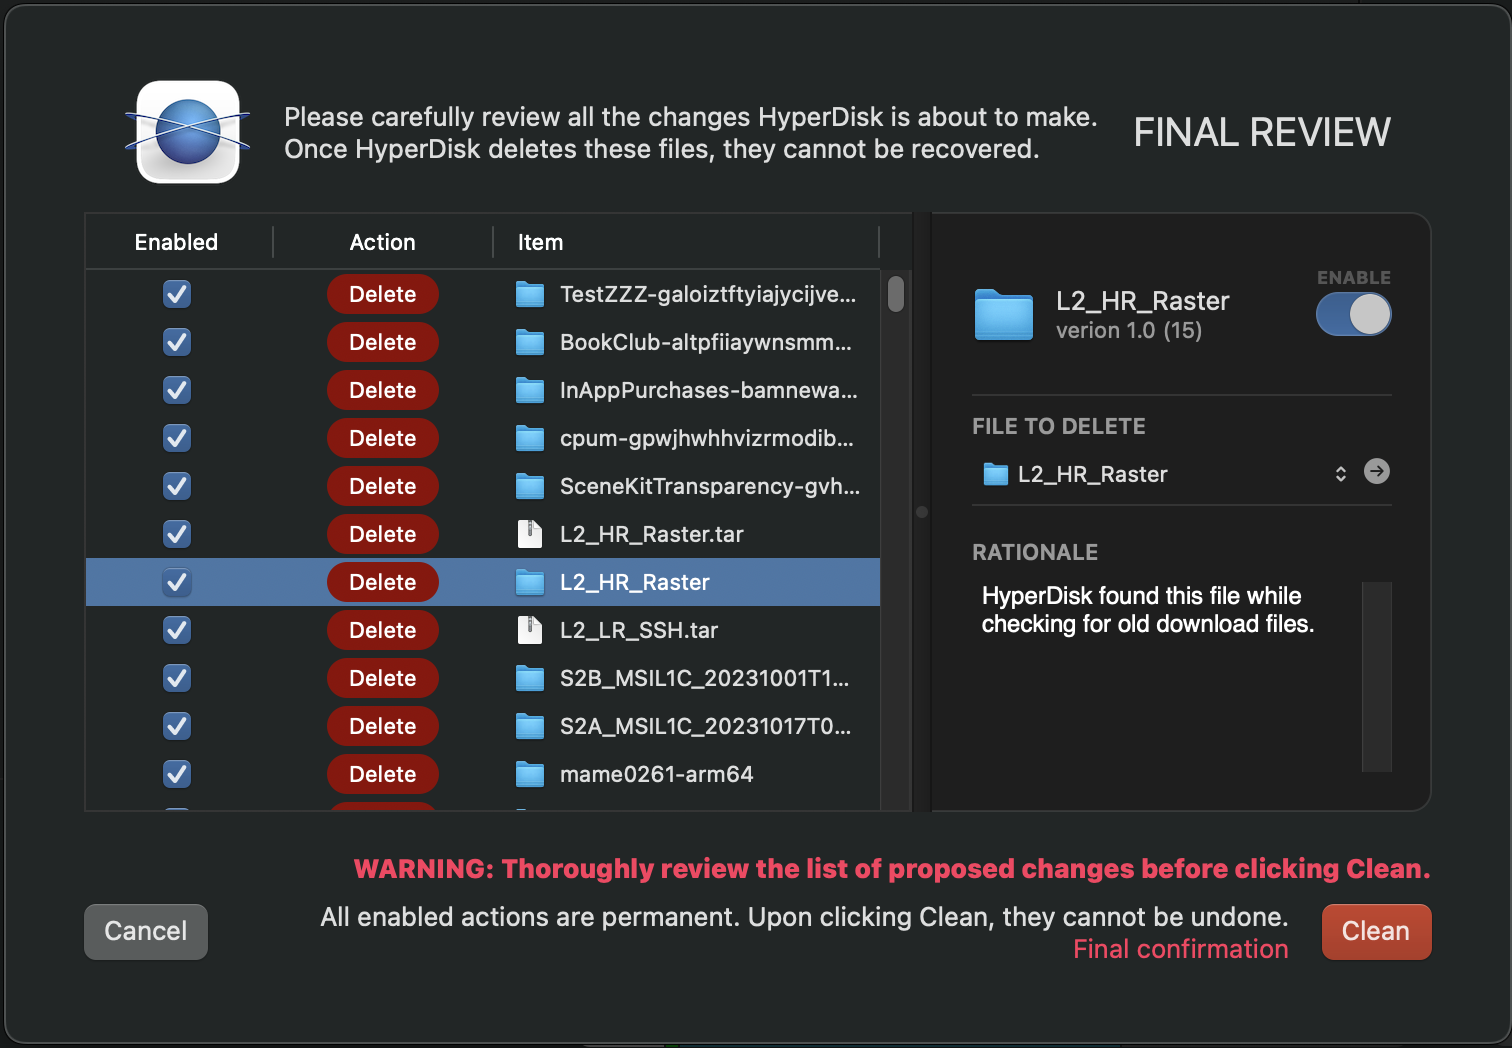
After clicking “Proceed to Final Review…” at the bottom-right, you’ll have one last chance to review all the deltions HyperDisk is about to make, and to approve or deny them. When you select one, a summary of the action is shown at the right, along with a brief rationale of why HyperDisk wants to delete that file. You can disable any of the proposed actions either by flipping the “Enable” switch, or by checking the box in the “Enabled” column of the table view.
Clicking Clean on this view is a final action, which will actually delete the marked files from your disk.
HyperDisk’s duplicate file scan will look through all the files in the folder you scanned, and find any identical copies. Files are only considered identical if their raw content is byte-for-byte identical to one another.
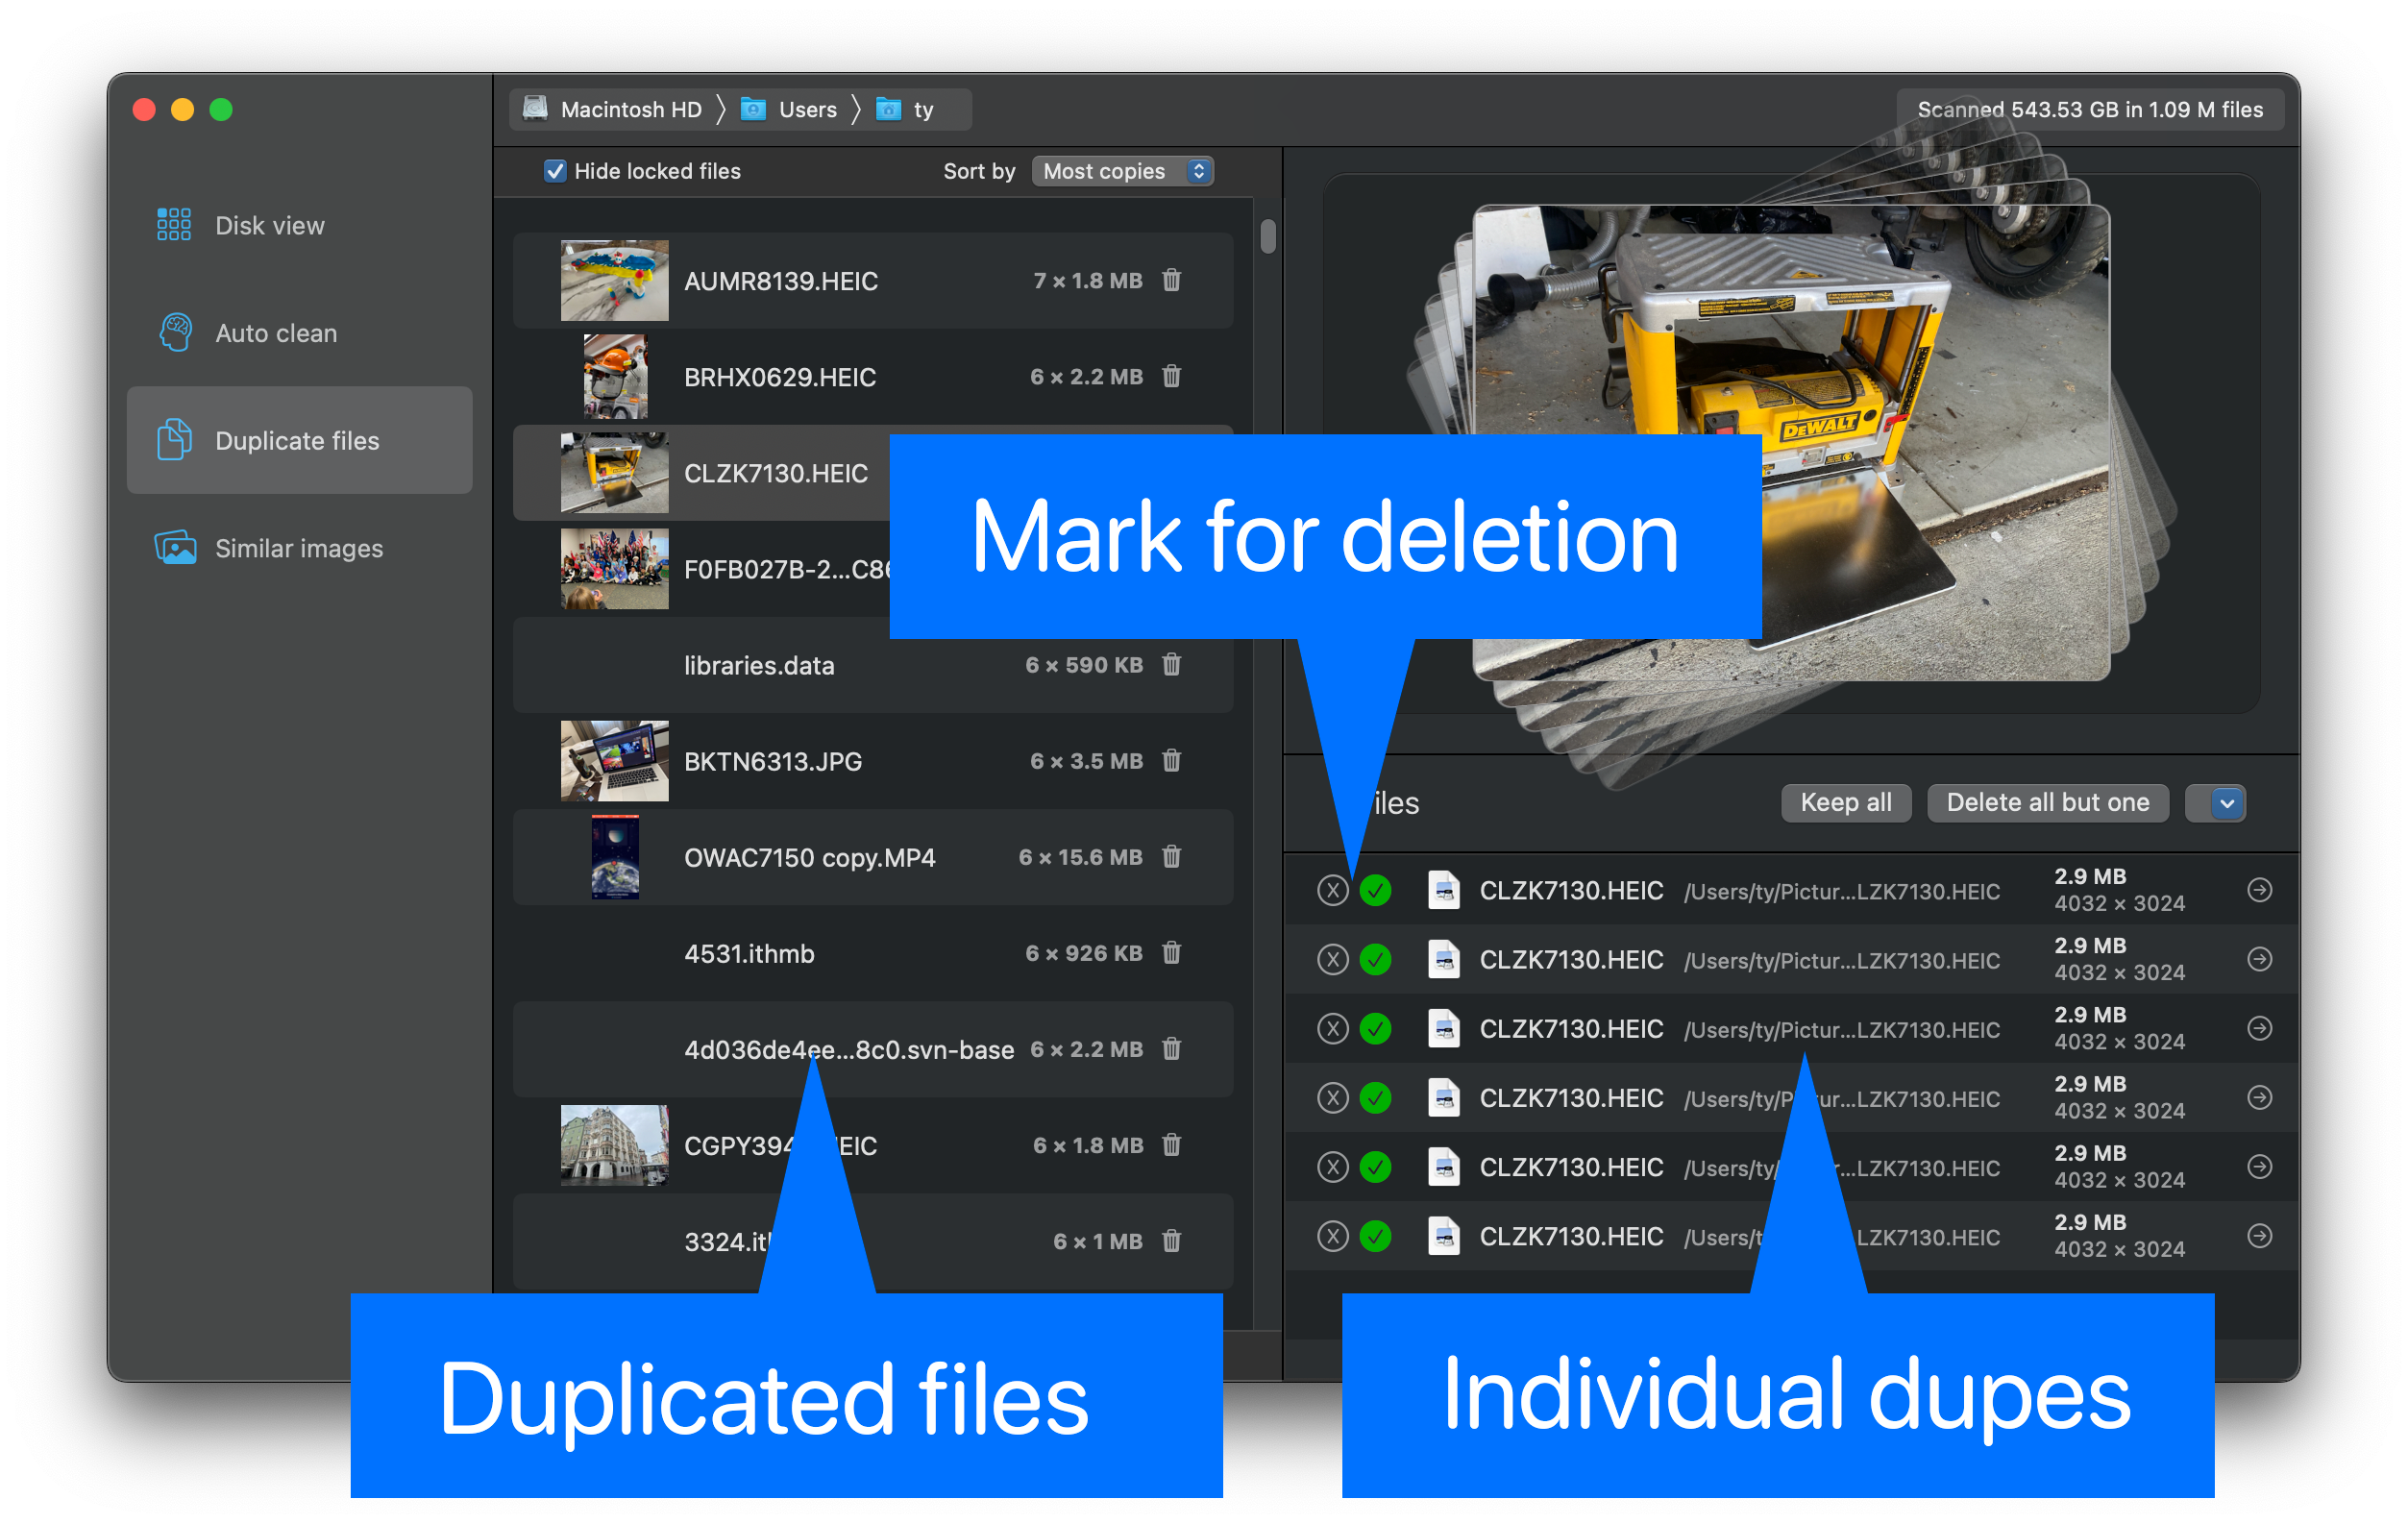
After the duplicate files scan has finished, results will be shown in a table. By default, files with the greatest number of duplicate copies are shown at the top. This sorting order can be changed via the “Sort by” popup. Also by default, locked files are not shown. (“Locked” is a flag that can be set on files in the Finder’s Get Info panel. It is an advisory flag that indicates that the file should not be deleted or modified.)
To mark files for deletion, click the ⓧ symbol next to the file that you want to delete in the bottom-right table. This will not immediately delete the file—you’ll have a chance to review your choices later.
You can also use one of the shortcut buttons, such as “Delete all but one.” This option keeps the file with the shortest path (i.e. the least deeply-nested file,) and marks other copies of it for deletion.
In the arrow menu to the right of “Delete all but one,” there is an option to hard link the files. This merges all the duplicate files into a single on-disk file with multiple instances, or hard links. The process of hard linking is described in more detail above, in the Hard links section.
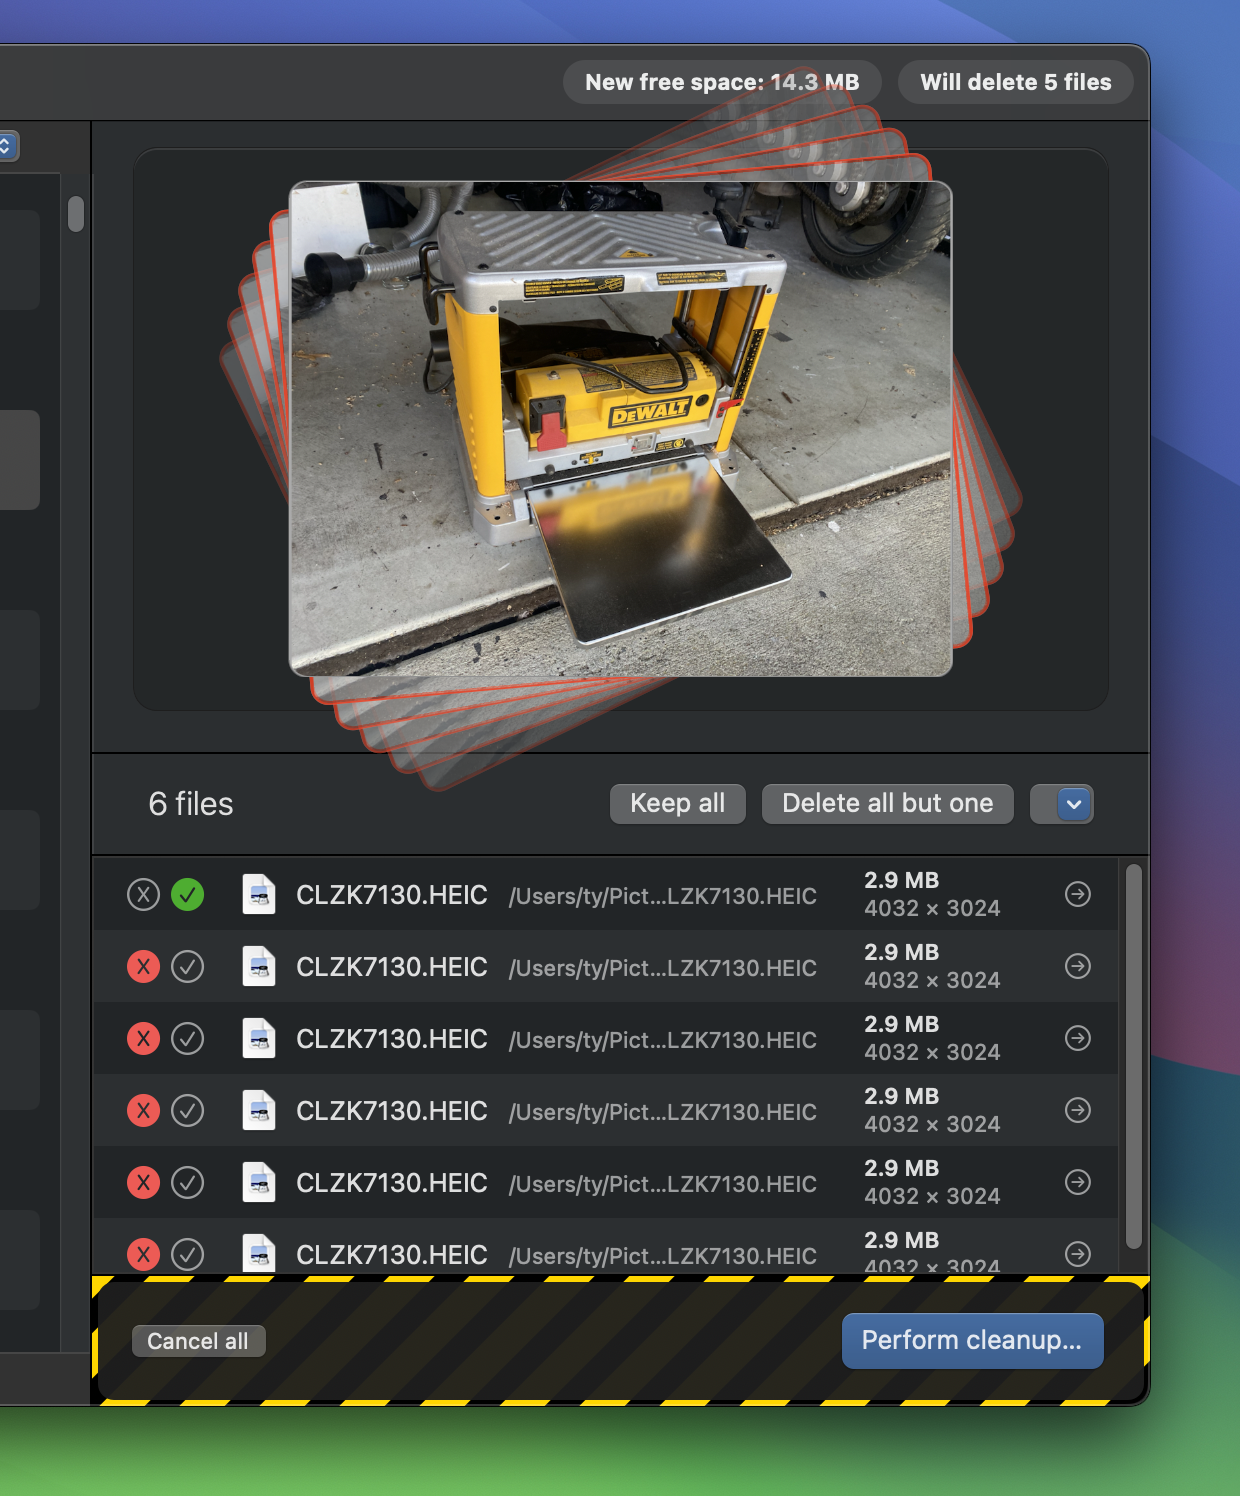
When you’re ready to delete the marked duplicate files, you can click on the “Perform cleanup…” button. This will present one final confirmation dialog with three buttons.
The Similar Images scan performs a deep analysis on all the image files on your disk. It compares photos for similar appearance. With this scan, images that look alike will be grouped together.
The Similar Images scan is useful for finding images that were taken of the same subject in rapid succession, or an image that was saved in different sizes or file formats.
The interface for this tool is the same as the Duplicate Files tool.
The interface for this tool is the same as the Duplicate Files tool.
The interface for this tool is the same as the Duplicate Files tool.
Apple’s current APFS filesystem introduced a number of broad changes from the legacy filesystem, HFS. In APFS, free space does not always update immediately. Often after deleting some large files, the disk will still claim to have the same amount of free space as before the deletion. This is normal, and sometimes it takes a while to update.

